NoFloods FlexWall
NoFloods FlexWall Models
| Product | Protection Height (cm) | Section Lenghs (m) |
|---|---|---|
NOFLOODS FLEXWALL 100 |
100 |
5 or 10 |
NOFLOODS FLEXWALL 150 |
150 |
5 or 10 |
NF FLEXWALL CORNER IN |
100 – 150 |
N/A |
NF FLEXWALL CORNER OU |
100 – 150 |
N/A |
IN: Inward corner module | OU: Outward corner module
Economical, robust, it suits commercial, residential, and industrial buildings where the structure serves as the barrier’s anchoring and back support, offering reliable, reusable flood protection ensuring minimal maintenance and rapid deployment when required.
Find the full details of the NoFloods FlexWall in our catalogues, including specifications, installation guidance, and examples of use. This innovative system provides sustainable, reusable flood protection while maintaining both appearance and accessibility.
Deployment, Extension and After Use
The NoFloods FlexWall offers versatile applications across various settings, providing effective solutions for numerous scenarios. For optimal use and maintenance of the FlexWall, always refer to the user manual for detailed instructions and guidelines. The manual provides essential information on setup, cleaning, and storage to ensure the longevity and effectiveness of the barrier.
Building Inspection and Planning
- Inspect the area to identify the potential flood path and surface conditions.
- Determine the installation line where the barrier will be mounted.
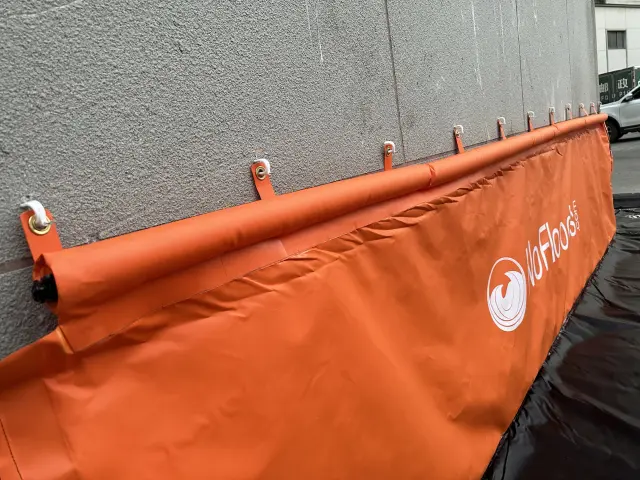
Insert Hooks into the Wall
- Identify the distance between the barrier loops.
- Install hooks or mounting fixtures into the wall according to the loop positions on the FlexWall.
- Make sure all hooks are secure and aligned properly for even tension.
Positioning and attachment of the Barrier
- Position the NoFloods FlexWall near the installation line.
- Carefully unroll the barrier along the wall, aligning loops with the hooks.
- Hang the FlexWall by inserting the loops onto the pre-installed wall hooks.
- Ensure the barrier is fully supported and evenly tensioned along its length.
Note: In windy conditions, we recommend using flexible or elastic straps—similar to those used on trampolines. These straps should be threaded through the barrier loops and then hung over the wall hooks. This to help absorb movement and prevent the barrier from pulling the wall hooks loose.
Fold Out the Bottom Membrane and place balast
- Unfold the bottom membrane toward the flood-facing side (away from the wall).
- Smooth out the membrane to ensure full contact with the ground and remove wrinkles.
- Place sandbags or designated ballast weights along the front edge of the membrane.
- Ensure ballast is evenly spaced to hold the membrane firmly in place and prevent water ingress.
Note: We recommend placing a small submersible pump between the barrier and the wall. This helps remove any water that may seep through and prevents the membrane from lifting. Route the pump hose to a proper drainage or discharge point.
How to Dismantle the barrier
- Turn off and safely remove the submersible pump. Drain and store properly for reuse.
- Carefully lift and remove all ballast from the membrane.
- Store or set aside for reuse.
- Fold the bottom membrane back up toward the wall.
- Smooth and align it for easy packing.
- Unhook the FlexWall loops from the wall hooks gently.
- Avoid damaging loops during removal.
- Roll the FlexWall tightly and evenly from one end to the other.
- Use straps or ties to secure it for storage.
Note: If temporary installation the wall hooks can be removed. Remember to close any holes in the wall to prevent water ingress.